Monday 20 April 2009

Shaping and welding the chassis (second part)

Last week, we were able to continue the main body shaping and the chassis’ rollbars welding.

The main body and the french team (Eric, Dorian and Nael)

To be able to mount the chassis, we also started to build the jig, which will be the outside support of the chassis and will let us weld every rollbars together.


Eric, building the jig

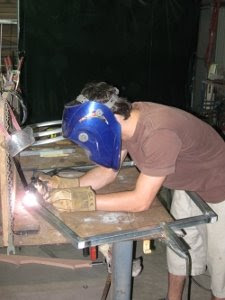
Nael, welding a rollbar

On an other hand, we drew on Solidworks the suspension and the direction, so as to be sure to have the accurate dimensions and the blueprints for when the assembly time will come.

All of this will continue next week. In addition, we hope we'll have the main body final shape, thanks to Alex Waters and his great shaping skills!

Anyway, there is still a lot of work to do...

Monday 13 April 2009

Second stage: Shaping the nose and building the chassis

As I told last week, we were planning to shape the main body. And so we did!

The car’s nose:

We started from a raw shaping (blocks of polystyrene foam glued together on the car’s skeleton), then we sanded the blocks to have the best cowling (according to our computed drawings).


Raw shaping in polystyrene foam


Nose’s cowling

The chassis:

The time has come to define what will be the main rollbar of the chassis. To do so, we focused on where the strength will be the most important.
That is why we selected four slices to be the main rollbars of the car.


Main rollbars

We then took the correct slices from the 3D drawing and cut through plywood (with a computed drilling machine) the slices so we have a pattern to weld the bars.

And so the welding has started! We were able to weld the 2 last rollbars of the chassis.


Last rollbar

The wheel pants:

The last interesting point of last week was the fact we also started to make the wheel pants. From drawing to the foam shape, we carried on making patterns for the main body!

Wheel pant blueprint

Thursday 2 April 2009

The Roadie’s main body construction! (Part 1)

First stage: the skeleton and the skin

We just passed through a red-letter week. After lots of preparation, the main body of our car starts to look decent!

First, to make the body properly, we had to design the pattern of the entire body to shape it.
The first stage in this project was to model the roadie, with 3D CAD design software and thanks to the specifications. When finished, we were able to get a 3D representation of the whole car.

Our job was then to build the car’s skeleton in raw wood, to be able to make the main body!
On the picture below, you can see a transversal view of the car with orthogonal boards of wood that will act as the ribs of the body to give the three dimensional outline.
Here is what we got: the main silhouette and several ribs!


Roadie’s skeleton

We were then able to stick polystyrene foam at the nose, and began to shape it roughly, waiting for the rest of the body to be built.

Nose shaping

In fact, in order to finish the shaping of the nose, we first made the important ribs of the car to support the transversal rods that will stand for the frame in the middle (see picture behind).
This is supposed to help us when finalizing the shaping of the nose by using the body curves to have the most accurate nose curves in extension.
It also allowed us to make the first fiberglass skin of the main body.


Main body

At this stage, it really looks more like a boat than a car !

Next stage : The real shaping!!!